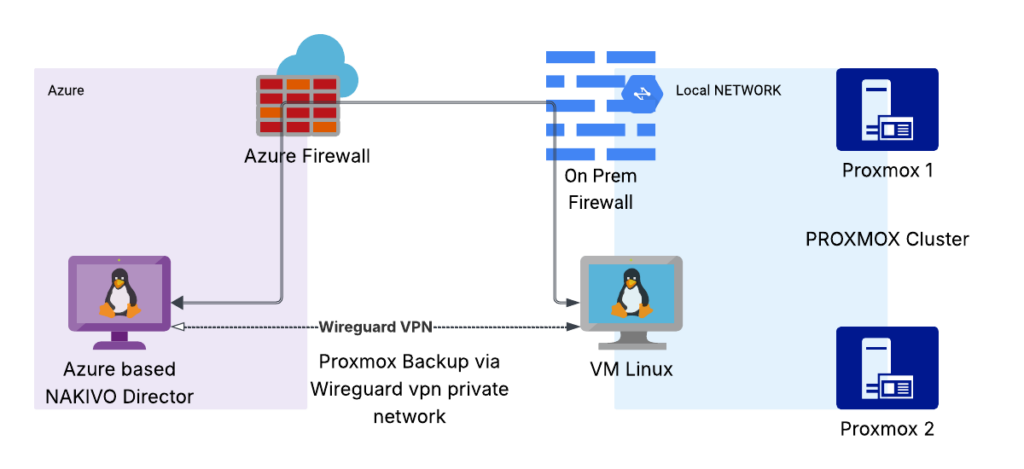
In this guide we will look at a simple way to backup Proxmox cluster from a remote network using NAKIVO backup solution with Wireguard VPN. As you can see on the image we have NAKIVO Director running in Azure cloud. We also have a Proxmox cluster behind NAT Firewall located on Premises.
Using NAKIVO with Proxmox and Wireguard
Backing up Proxmox with NAKIVO Backup & Replication can be a smart move, especially if you’re looking for enterprise-grade protection, ransomware resilience, and centralized backup management — all beyond what Proxmox’s native tools offer
NAKIVO
WIREGUARD
PROXMOX
Current Configuration:
- Proxmox Cluster consists of 2 Nodes. Node 1 – 192.168.0.2 and Node 2 – 192.168.0.3
- Wireguard will be configured to run on port 33445
- Azure Access list will have port 33445 on public insterface of Azure Based NAKIVO Director
- Wireguard Wg0 interfaces will be configured on 192.168.1.0/24 network
- Wireguard server will be installed on Azure based NAKIVO Director
- Wireguard client will be installed on VM Linux
- In our case VM Linux running as virtual machine on Proxmox but it could be any system with connectivity to 192.168.0.3 network.
- Public IP address of Azure NAKIVO server is 154.16.10.4
What we want to accomplish:
We want our Azure Based NAKIVO Director to be able to ping and connect to both Proxmox cluster nodes on private network. To test it we want to be able to successfully ping 192.168.0.2 and 192.168.0.3 from NAKIVO Director.

This will allow us to run secure NAKIVO backup using WireGuard VPN
VPN Solution
WHY Wireguard was choosen for our VPN
Performance
WireGuard is fast — often faster than OpenVPN or IPSec:
Uses state-of-the-art cryptography (like ChaCha20, Curve25519, BLAKE2s).
Built into the Linux kernel (since 5.6), giving it near-native performance.
Lower latency and better throughput.
Strong Security
WireGuard:
Only uses modern, opinionated cryptographic choices — no legacy algorithms.
Has forward secrecy, protects against key compromise.
Enforces key rotation easily.
Cross-platform
Works on Linux, Windows, macOS, Android, iOS, and even routers.
On Linux, it’s integrated into the kernel for maximum performance.
On other platforms, it still performs well with the official apps.
Good for Zero Trust + Site-to-Site VPNs
Ideal for Zero Trust network models.
Excellent for site-to-site or mesh VPNs, even at scale.
Install WireGuard server on Azure based NAKIVO Director
We will start by configuring Wireguard VPN Server which will be located on Azure based NAKIVO Director. We will assume that local network interface is Eth0 and IP address is 192.168.15.2/24 but please node public facing ip address will be 154.16.10.4 in our case.
We will start by installing Wireguard software.
					apt update -y
apt upgrade -y
apt install wireguard
We will now enable packet forwarding on WireGuard server. We will need to edit following file to accomplish this.
					vim /etc/sysctl.conf
####### uncomment the following line by removing the # at the beginning of the line
net.ipv4.ip_forward=1
####### apply new option by using command below
sysctl -p
net.ipv4.ip_forward=1
Generating private and public keys. This step is nessesary as WireGuard works by encrypting the connection using a pair of cryptographic keys. The key pair is used by sharing the public key with the other party, who then can encrypt their message so that it can only be decrypted with the corresponding private key.
					cd /etc/wireguard
##### generate keys
wg genkey | tee privatekey | wg pubkey > publickey
##### confirm both keys are there
cat privatekey
cat publickey
We will now generate server configuration file which is stored in /etc/wireguard/wg0.conf
We assume VPN is will run on port 33445. We also will be configuring VPN on separate network 192.168.1.0/24 and remote network where Proxmox servers located on network 192.168.0.0/24. The server wg0 interface will be 192.168.1.1/32
					 vim /etc/wireguard/wg0.conf
[Interface]
Address = 192.168.1.1/32
ListenPort = 33445
PrivateKey = "privatekey of local server"
PostUp = iptables -t nat -A POSTROUTING -s 192.168.1.0/24 -o eth0 -j MASQUERADE
PostDown = iptables -t nat -D POSTROUTING -s 192.168.1.0/24 -o eth0 -j MASQUERADE

##### we dont have this information untill we configure client
[Peer]
PublicKey = "remove vm linux public key"
AllowedIPs = 192.168.1.2/24, 192.168.0.0/24
##### Persistent Keepalive is a simple yet powerful tool for maintaining steady and reliable network connections. By preventing unwanted disconnections, it ensures seamless communication and smooth operation of applications that depend on ongoing connectivity
PersistentKeepalive = 25
Install WireGuard client on VM Linux
The client will let our Azure NAKIVO system to connect with internal 192.168.0.0/24 network. This will let us run secure Proxmox VE backups using WireGuard VPN tunnel.
Lets start by installing WireGuard software
					apt update -y
apt upgrade -y
apt install wireguard
Next we will generate private and public key same way as we did in our previous example
					cd /etc/wireguard
##### generate keys
wg genkey | tee privatekey | wg pubkey > publickey
##### confirm both keys are there
cat privatekey
cat publickey
We will now generate client configuration file which is stored in /etc/wireguard/wg0.conf
We assume VPN is will run on port 33445. We also will be configuring VPN on separate network 192.168.1.0/24 and remote network where Proxmox servers located on network 192.168.0.0/24. The server wg0 interface will be 192.168.1.2/32
					vim /etc/wireguard/wg0.conf
[Interface]
Address = 192.168.1.2/32
ListenPort = 33445
PrivateKey = "privatekey from local system"
PostUp = iptables -t nat -A POSTROUTING -s 192.168.1.0/24 -j MASQUERADE
PostDown = iptables -t nat -D POSTROUTING -s 192.168.1.0/24 -j MASQUERADE


[Peer]
PublicKey = "public key of remote azure NAKIVO server"
Endpoint = 154.16.10.4:33445
AllowedIPs = 0.0.0.0/0
##### Persistent Keepalive is a simple yet powerful tool for maintaining steady and reliable network connections. By preventing unwanted disconnections, it ensures seamless communication and smooth operation of applications that depend on ongoing connectivity
PersistentKeepalive = 25
Test our WireGuard VPN
Now all we have to do is test our VPN and make sure from the NAKIVO server you can ping any system located on 192.168.0.0/24 network. Run the following command on both systems to start VPN
					##### Run this command on both systems
sudo wg-quick up /etc/wireguard/wg0.conf
##### From our Azure NAKIVO server
##### Before testing make sure route is added on NAKIVO server to send all trafick for 192.168.0.0/24 network to interface wg0
ip route add 192.168.0.0/23 dev wg0
ping 192.168.0.2
ping 192.168.0.3
ones we can successfully ping both cluster members we can now start backup process.
Backup Proxmox VE with NAKIVO Backup
NAKIVO now supports agentless backup which is a newer approach for VM backup that involves backing up an entire VM at the host level (from a hypervisor) including all VM files. This is a more efficient approach for virtual machines and provides advantages compared to agent-based backup.
Fast and efficient backups
Create incremental, image-based and app-aware backups to ensure data consistency
Quick and reliable recovery
Fully restore Proxmox VM or instantly recover individual files and objects to original or custom locations
Anti-ransomware protection
Enable backup encryption and immutability to protect data against ransomware and other threats
Flexible backup storage
Send backups to various storage types, including NAS, public and private cloud and tape
Lets get started and add Proxmox to the NAKIVO Inventory. Open NAKIVO WEB interface and go to Settings – Inventory. For the platform select Virtual and choose Next.
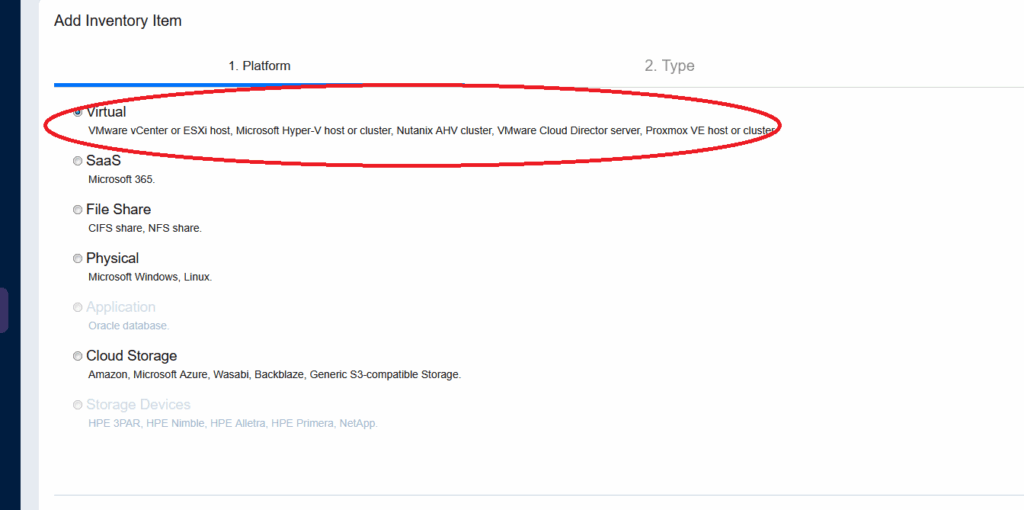
Next select Proxmox option

Enter required information for your Proxmox cluster. Any node of the Proxmox cluster will do the job. In our case we adding 192.168.0.2 which is private IP address of Proxmox host.

Our Proxmox cluster should be now visible under Settings – Inventory preferably with no errors. At this point Transporter role should be installed on each node in our cluster.
At this point we are ready to create backup jobs over private WireGuard VPN Network.
Looking for help with NAKIVO and Proxmox?
Talk to us about your current Proxmox backup needs , so we can help choose the right approach to move your business forwards.